grilled

Rise and Shine!

The Hawaiian culinary scavenger hunt continues!

Photo courtesy of Honolulu Fish Auction.
Honolulu Fish Auction. This photo is courtesy of the Honolulu Fish Market.

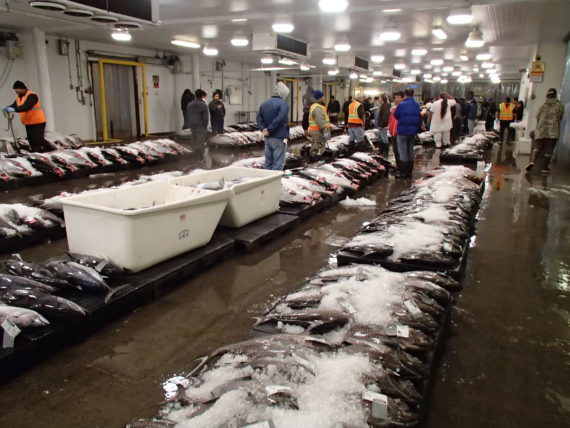
Ready, set, WAKE UP!!! I’m not kidding this is your 4am wake up call in paradise, seriously grab some Kona coffee put on your warm clothes (not kidding you will be in a freezer) and head out on the H1 Highway to Pearl City. The Honolulu Fish Auction is your destination, if you choose to take this crack of dawn food tour, please I beg you, go on the tour, but call ahead to make sure they are open I believe they are closed on Sundays. Have you ever wondered how fish is graded for sushi? How about watching the fishing boats unload their catch? This can all be done and I guarantee you will receive an education like no other and you will love it! Even better, bring cash with you and just like the fish markets and restaurants you can purchase your own fresh caught fish at a fraction of the price. 

 The prize I was after was a little know fish outside of Hawaii and the South Pacific, coming in anywhere between 1-18 pounds. Long about late summer when Hawaii’s waters turn cool the fish in deep waters develop a nice fat layer which adds a sweeter level to their flavor. I was after Hawaiian pink snapper, Opakapaka. This sweet and delicious fish is found at depths between 18 and 600 feet , all Opakapaka are caught by deep water hand line gear with power reels. The bright pink flesh garners a higher desire for its sashimi cuts because of delicate sweetness. 

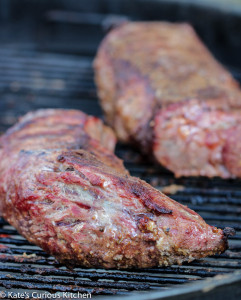
Once I found my prize fish I headed back to our condo and started my food prep, the Opakapaka was seasoned and wrapped in foil then placed in the fridge to marinate. In addition I sliced up some Hawaiian sweet onions and seasoned with salt and pepper, fresh cut pineapple spears were in a zip bag with teriyaki sauce and red chili flake. Chinese long beans were in a foil pouch with sesame seed oil, sliced fresh ginger, Hawaiian sea salt and pepper. Long about 5:00pm I turned on the rice cooker and out the door I headed with our food, I was set to go make friends with that spectacular and ridiculous sized Weber grill outside. Now is where I slammed on the breaks, I turned the corner at the BBQ area entrance and you know that feeling when you walk in a room and all of a sudden every eye is on you and you might possibly be getting the judgement stare. Well, welcome to my experience, however there was a great lesson to be learned.


I made my way over to a grill and started to place all of my items on the table, pretty quickly the other people a the grills were looking my way. Then the questions started, “what’s in the foil?” “What are those long green things?” “Why is that pineapple red?” “You have a whole fish in there, can we see it?” “You a chef or something?” Welcome to Kate’s Curious Kitchen impromptu cooking school, there I was teaching six men and their friends all about layering flavors, fresh caught fish and how to get out of a BBQ rut. I should have charged them but I got a few nice beers out of it so all is good.

The moral to this culinary story is simple, share. Always share your knowledge, someone somewhere does not know how to cook what you are cooking and if they are interested, show them. Be open to new flavors, I really shocked the men when I grilled off some of that pineapple they were set on not liking it and low and behold there i was texting them the recipe. Simple twists and ingredient changes can develop a whole new level of flavor. Just like the previous post I have included some links for you to make your Hawaiian food shopping a bit easier, in no way am I receiving any compensation for providing these links. I just want you to have fun coking your food!

Mahalo and enjoy!!

Grilled Opakapaka

One, 5 pound whole Opakapaka or red snapper. Cleaned, de-scaled and patted dry

4 tablespoons fresh ginger, minced

4 garlic cloves, minced

1 bunch green onions rough chopped, white ends too

1 cup low sodium soy sauce

½ cup water

½ cup dry white wine

1 teaspoon alaea salt or Hawaiian sea salt

½ teaspoon black pepper

½ teaspoon toasted sesame oil

2 teaspoons Sriracha


Place your whole fish in a deep pan, set aside. In a bowl mix all your other ingredients together then pour over the fish. Make sure the marinade gets inside the fish too. Cover and place in the fridge for up to 4 hours, turning once at the 2 hour mark.

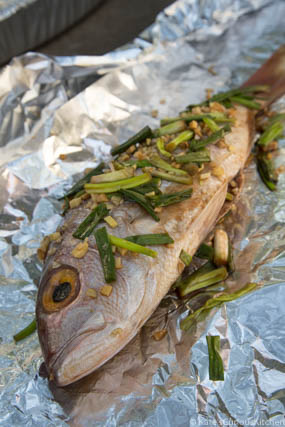
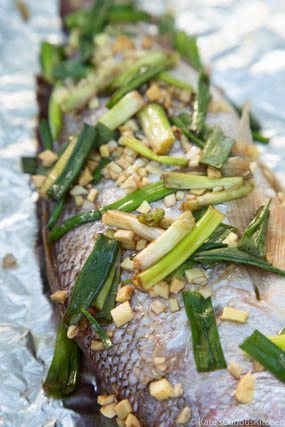
When ready to cook, heat your BBQ Grill, if using gas light all burners on high (500 degrees), if using a charcoal grill prep the charcoal mound in the center of your BBQ. When coals are covered in white ash they are ready. While the BBQ is heating make a double layer foil packet, cut it long enough to fold in half and cover the fish completely. Imaging the foil is a sleeping bag and the fish is going to be inside of that. Take ½ the chopped green onions out of the marinade and place on the foil pack. Remove the fish from the marinade; do not brush off any of the ginger or garlic. Place the fish on top of the green onions and now place the remaining green onions on top of the fish. Seal the foil up tight on all sides and take it out to your grill. Spread out the coals if using a charcoal grill, lower the two outside burners on your gas grill to medium lower the center burner to medium high.

Place fish on heated grill and close the lid, after 12 minutes flip the packet over and cook another 10 minutes.  Remove from grill and let it steam in the foil another 5-10 minutes while you are prepping the plates.

Open the foil and flake off pieces of the snapper; watch out for the bones they are long and very translucent. Serve with steamed rice, lemon wedges and a sprinkle of mirin sauce or just on its own, enjoy!


https://www.hawaii-seafood.org/auctiontour/

http://www.nohfoods.com/

http://www.onlyfromhawaii.com/seasonings.aspx

http://www.hawaiiansunproducts.com/


Barbecue Tri-Tip

Santa Maria Style Tri-Tip

Welcome to California’s pride and joy of barbecue! This small to medium-size triangular muscle of the bottom sirloin subprimal cut (my God that was exhausting) screams for a good amount of spice, smoke and heat. I have done the official research and the credit needs to go to one man for making it as popular as it is today here in the golden state. Otto Schaefer marketed this cut back in 1950 in Oakland, California. But as far back as 1931 the cattlemen of the central coast, the Santa Maria area, were barbecuing meat on strings over hot coals with basic seasonings. Then the adoption happened Tri-Tip became Santa Maria’s ” signature pride and joy cut” truly barbequed beef was launched into a new territory. Go ahead, Google “Santa Maria Style BBQ.” I dare ya, oh and have a towel ready, you’re going to drool and go racing out to your nearest butcher to obtain this precious low-fat, full flavored cut of beef. I have two in my fridge right now about ready to kiss the grill any second.

 There is a bit of a disappointing part, many butcher shops east of the California/Nevada/Arizona border do not market the tri tip cut-you’re going to have to ask for it. This is where you will start to build a relationship with the specialist; a butcher, a professionally trained expert in the animal protein world. If you already have a good relationship with yours it’s going to get even better. I don’t know a butcher around that does not want to market the “next best cut” and tri tip will do it in spades. I’m also guessing you will be able to purchase it for quite a bit less than us right now I paid about $9.95 a pound. The secret is to not overcook this marbled fat flecked beauty. Medium is about as done as you will want it. The soft pink hue throughout its center is the signature look with its crusty pepper, garlic, salt and onion seasoning that perfectly kisses the char marked and smoked tri tip is out of this world.

PFC. Dunbar United States Army
PFC. Dunbar
United States Army

My son, Sean, has the say on this share, he’s kind of nuts over my barbecue seasoning and knows it’s one of my secrets. Before this entry is published I will send him the ingredient list so I can uphold my end of the bargain to let him know first above all others. I created my seasoning blend about 15 years ago, yes I was happily barbecuing away at age 24 living in my tiny two-bedroom home with my son Sean trying to make it as a single mom living humbly, very humbly. I would save my money all month I would budget correctly and buy one tri-tip then I would do the sin of the earth, I would cut that piece of beef into three smaller pieces so we could eat barbecue almost every Friday.

I would make a small pyramid of charcoal briquettes in my weber kettle grill then with a small well in the top I would crumple some newspaper and light it. When the coals were blazing red and covered in heavenly white ash I would place the grill grate over the coals and lightly oil it using a few paper towels crumpled together and soaked in a bit of cooking oil held with tongs and brushed over so the meat would not stick. I would wait about 10 minutes for that grill to get searing hot. Then I would throw a few mesquite wood chunks (not chips) on the hot coals just moments before the meat was put on the grill, quickly the backyard filled with sweet mesquite smoke the black pepper, garlic, onions and chili spice too. The sizzling and popping sounds from the searing meat and fat (I just drooled) were the symphony of a perfect Friday night Mother and son tradition. I would let that small portion cook on the grill for about eight minutes then I would turn the meat over and cook the other side about eight minutes longer. When it was ready I would take the tri tip off the grill and give it a good 10 minute rest time before slicing it. My choice is to slice it against the grain so the meat is most and tender, I would also make my slices about a ¼” thick, traditional tri tip cuts are about ½” thick. Sean would be waiting at our table in his seat just smiling away, as he ate I would watch my son melt in that tri trip’s smoky mysterious taste. I loved those Friday night dates with him, when he comes home on leave from the Army this one of the first meals he asks for.

If I was grilling a whole tri-tip it would be cooked a bit differently I would set up the charcoal in an indirect method, hot coals on one side of the kettle, empty space on the other. When it was time to put the meat on the grill grate you place it on the side without the heat directly below. Put  the lid on and position the vent holes over the tri tip to: draw the smoke around it further to add to the richness of the flavor, have the vent holes about 3/4 way closed. After about 45 minutes it was done and off the heat with a resting time of about 10 minutes. If you’re using a smoker 225° for about four hours with good mesquite, apple, or even pecan wood but only for the first two hours. Adding wood chunks will produce one heck-of smoke ring; it’ll be a gem! Get out your grill, clean it down, oil the grills grates and go see your butcher.

Cheers!

Tri-Tip Seasoning

Ingredients
1.    4 tablespoons Kosher salt
2.    4 tablespoons light brown sugar
3.    1 teaspoon paprika
4.    1 teaspoon ground pepper
5.    1 teaspoon ground cumin
6.    1 teaspoon dried oregano
7.    1 teaspoon dried parsley
8.    1/2 teaspoon turmeric
9.    1/2 teaspoon onion powder
10.    1/2 teaspoon garlic powder
11.    1/4 teaspoon chili powder
12.    1/4 teaspoon ground cinnamon
13.    1 teaspoon cornstarch

Instructions
1.    Place all ingredients into a zip bag or a jar with a lid and shake well. Store in your pantry or spice cabinet.

Notes
1.    This seasoning is also amazing on pork, chicken and lamb.