If you have ever driven US Route 101 in California near San Luis Obispo there is a kitschy land mark that has welcomed cattlemen, cowboys, cowgirls, brides, honeymooners and road travelers since 1958. Ladies and Gentlemen I am referring to The Madonna Inn, I cannot remember my first time there but I can tell you I was little, maybe four or five. The pink walls, pink patterned carpets, oversized floral bouquets, huge crystal goblets, Swiss milkmaid waitress uniforms, pink sugar for ice tea or coffee, copper toped tables, copper salt and pepper shakers and then the Copper Café’s famous Bakery. With over eight types of cakes and the same number of pies this bakery has grown tremendously not only in kitsch but in the hearts of many who have eaten sweets from this step back in time bakery. Some of the newest additions are chocolates, cookies, cupcakes and other sweet treats.
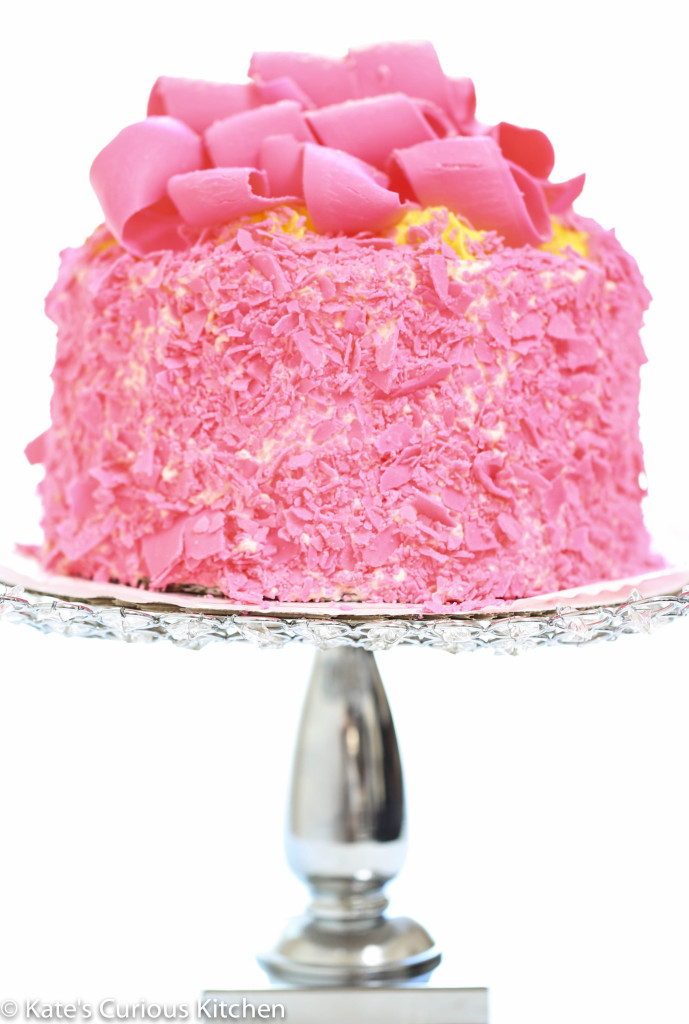
However, there is one cake the Madonna Inn is famous for creating and that is, the Madonna Inn Pink Champagne Cake. Three-lovely and feather light white cake layers all snuggled in-between a whipped almond flavored Bavarian cream and fresh made whip cream. The outside of the cake is iced with a whip cream icing and tiny hot-pink colored white chocolate crumbles are pressed into that amazing whip cream. Then the ultimate cake topper or crown is stacked mile high, curls and curls of that same hot-pink colored white chocolate then those thick ribbon like curls have a soft dusting of powder sugar on top. The finished cake resembles a beautifully decorated French hat box with billowing satin pink bow.
I could eat this cake all the time, yes it is rich, yes it is sweet and yes it is full of sugar, fat, cream and chocolate! It is worth every extra pound I have put on my body by eating it over my 39 years on this planet. I love this cake, I cannot express it any other way than just that, its a little girls dream cake always has been to me and it will always remain that way. When you take your road trip to the famous Madonna Inn spend time there, do not rush your visit. Go have a bite to eat at the Copper Café or sit down at Alex Madonna’s Gold Rush Steak House and enjoy a cattleman’s dinner among the 1960’s style pink tucked leather booths. Billowing all around you are the pink silk flowers, twinkle lights, Tiffany style chandeliers and if you can find her there is the little doll perched high over your head swinging away in her tree swing, the soft sounds of music floating in from the Silver Bar Cocktail & Lounge and maybe on a good night you will see Lady Madonna herself, Mrs. Phyllis Madonna. Ask her to come over and tell you her story about why her loving husband Alex Madonna built this Americana landmark.
I was just there a few days ago picking up my lovely 8” round cake (for a steal at $35.00) and I asked the young lady helping me, “is that fresh whip cream that’s used on the out side of the cake and in-between the layers?” Her response “Yes, on the outside and only one of the layers the rest are whipped almond flavored Bavarian cream.” Then I asked, “do you color the chocolate here, is it a powder color or a liquid?” She replied “I’m sorry I can not tell you.” Can you tell me if you make the curls and crumbles here?” “Yes, we do. “ “Can you tell me if it’s an egg white cake like a chiffon?” With a pause and a slight head turn she stated- “quite possibly”. That was it, I had the basic information now to drive home and get this sorted out.
To date I believe I have introduced well over 150 people to this cake, my husband and my three children have been the best sports whenever we hit the road to travel north. They know that the car is going to pull over so I can have a walk back in time with my memories and create new ones with them. My daughter flutters in all the pink and glitter, my sons they like the downstairs men’s room. Why? The men’s bathroom is famous; maybe a bit more than the cake, it has a motion-censored waterfall instead of a urinal and when my youngest son was about three-year-old that was the best experience he could ever have at using the big boy potty. On average I loose my youngest son to that waterfall at least four times during our meal. I can promise you stopping at the Madonna Inn will brighten your day, you will have the biggest smile on your face and a good giggle too. Go get some cake, go look around, count how many colors of goblets there are, walk the gardens, sneak a peek at the waterfall and please tell Phyllis hello from me.
Cheers!
Champagne Cake
Light and tender white cake with a hint of champagne and almond.
Ingredients
1. ¾ stick of softened unsalted butter
2. 1 ½ cups granulated sugar
3. 3 cups sifted cake flour (swans)
4. 1 teaspoon vanilla
5. 1 teaspoon champagne extract or almond extract
6. 1 tablespoon baking powder
7. ½ teaspoon salt
8. 1 cup room temperature whole milk
9. 6 egg whites at room temperature
Instructions
1. Preheat oven to 350 degrees F. Grease and parchment line 2-9 inch cake pans. With an electric mixer or stand mixer on medium speed, cream butter and sugar. Mix in vanilla, champagne extract or almond extract. In a separate bowl, sift cake flour, baking powder and salt. Add flour mixture alternately with milk until all combined. In a clean, dry bowl beat egg whites until stiff but not dry. With a rubber spatula, add a scoop of the egg whites to the cake batter and slowly fold in, add a little more egg white and fold in, continue until all the egg white is incorporated into the batter. Divide batter between pans. Tap on the counter to level.
2. Bake for 25 to 30 minutes. Test with toothpick for doneness, only tiny amounts of crumb should hold to the toothpick. Cool cakes in pans for 10 minutes then turn over onto rack for 10 minutes. Remove pans and allow to cool completely.
Notes
Assembling the Champagne Cake
1. Take one cooled cake round and place it on a serving plate or cake board, spread a ½ inch layer of the Bavarian cream all over the cake but keep the cream a ¼ inch from the edge of the cake.
2. Split the second cake layer in half horizontally and place the first of the split layers on top of the Bavarian cream, center your cake. Add a ½ inch layer of your stabilized whip cream keeping a ¼ inch from the edge of the cake.
3. Place the second layer of the split second cake on top of the whip cream and now spread a ½ inch layer of the Bavarian cram. Making sure to keep it a ¼ inch from the cake edge.
4. Place you last cake layer on top of the Bavarian cream, push the cake layers down slightly to level then smooth a good layer of the whip cream all over the cake and press the hot-pink chocolate crumbles into the sides and top of the cake.
5. For other decoration, you can add the Bavarian cream to a pastry bag with a star tip nozzle and decorate the top and bottom of the cake base. Keep cake refrigerated.
Whip Cream Icing
This is a stabilized whip cream icing. It is necessary so the whip cream does not slide off your cake.
Ingredients
1. 2 cups very cold whipping cream
2. 3 tablespoons sifted powder sugar
3. 1 teaspoon clear vanilla or almond extract
4. 1 teaspoon gelatin
5. 1 ½ tablespoons cold water
6. 1 ½ tablespoons boiling water
Instructions
1. To prepare the gelatin, get a small bowl and add the cold water to it, sprinkle the powder gelatin over the water and let it sit for 5 minutes. Add the boiling water to the gelatin mixture and stir to dissolve. Set aside.
2. Whip Cream; place your cold whip cream, powder sugar and flavor in a mixing bowl use a hand mixer or stand mixer on medium high speed for 1 minute, slowly add the liquid gelatin to the cream and then mix until stiff peaks form- be careful, if you mix it too long you will have butter. Keep in fridge until ready to ice cake.
Notes
1. If you choose to color your whip cream, make sure to add your coloring to the cold whipping cream before you start to mix it.
Bavarian Cream
Makes 4 cups
1 package Instant Vanilla Pudding (5.1 oz package)
2 cups heavy whipping cream
2-5 Tb. milk
Directions:
Beat the whipping cream on high until stiff peaks form. Run the mixer on low while slowly sprinkling in the pudding powder. Mix until fully incorporated. Add milk 1 Tb. at a time, to reach desired spreading consistency. Add more milk for a thinner, smoother filling.
Pink Chocolate Crumbles & Curls
Ingredients
1. 2 bags white chocolate chips
2. hot pink food color
3. whisk
4. double boiler
5. parchment paper
6. spatula
7. OR USE
8. Wilton Candy Melts in hot-pink, follow the directions on the back of the package on how to melt the chocolates. When you have a smooth consistency spread the melted chocolate in an even layer on parchment paper and allow it time to cool 15-20 minutes. Once cooled break up into small pieces and keep covered until ready to use.
Instructions
1. Double Boiler Method
2. Heat water in the bottom portion of your double boiler, bring to a boil then turn the heat to low so the water is simmering, in the second bowl add the white chocolate chips and place that bowl over the simmering water, wait 5 minutes then slowly start stirring chocolate. When only a few lumps remain take the bowl off the hot water and continue to stir placing the bowl on a folded towel it will help keep the chocolate warm and the bowl will not slip. When the melted chocolate is smooth add a few drops of food color and mix well. Then spread out your chocolate on a piece of parchment paper and allow to cool for 15-20 then break it up into pieces.
Notes
This is the youtube link to the video that shows you how to make chocolate curls: http://www.youtube.com/watch?v=0UA0opJ_coE
