Dinner

Best-Ever Panini Press Sandwiches

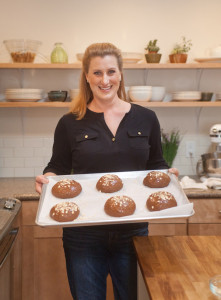
I love when it is panini night at our home, the smell of browned butter and toasting bread. That crisp bread crunch and then the soft and silky melted cheese are culinary perfection. From melted Swiss cheese and onions to cheddar and bacon this meal is not only simple but packed full of flavor.

The challenge is to grill the bread correctly and achieve those deep grill marks with out burning, then getting the cheese to melt evenly but still hold its shape. The solution, use good and sturdy artisan bread that has 1/2 inch slices. Choose good cheeses, it is a must, sample as many as you can from your deli then make your selection. Letting your cheese sit out for about 5 to 10 minutes to get the chill off before grilling ensures even melting. Using a panini press that evenly heats the griddle plates is key, you can guarantee a crips texture, golden color and perfectly warm melted cheese filing.

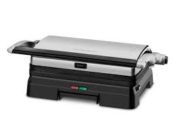
You can find this exact model panini press in my pantry, I love the Cuisinart grill and panini press. The plates heat up quickly and evenly which toasts the bread or what ever you want to press in it. The simple to see green light turns on when your panini is ready, there is no guess work. The griddle plates are nonstick so your clean up time is a breeze, no more burnt on cheese remains. Along the backside there is a drip pan for catching any butter or olive oil run off.

Perfect Side Dishes for A Panini

Roasted tomato soup is the top side dish for any panini. With a creamy and silky texture this soup calls for melted cheddar, jack and cheese sandwich to be dunked then swooped up into your mouth to enjoy all that salty and rich flavors.

Arugula salad with lemon vinaigrette, the peppery flavor from the arugula and the bitter yet salty vinaigrette balance the fattiness of all that cheese. Use the same olive oil to brush over the bread for your the sandwich and in the salad dressing, the flavors marry the ingredients perfectly.

Sweet potato fries with a sprinkling of sea salt are a delicious addition to a warm spice panini grilled cheese sandwich. Think about adding rich Indian flavors such as sliced roasted curry chicken, chutney and gouda cheese.

Tips

If you choose to use a grill pan instead of a panini press, heat the pan on medium-low heat for 10 minutes. Place the buttered grilled cheese sandwich in the pan and reduce heat to low, add a small plate on top of it and a heavy soup can. That weight will press your sandwich perfectly.  Once the bread is golden brown and the cheese is melted remove it, sprinkle some finishing salt and fresh ground black pepper over the top or add some fresh chopped herbs.

Slicing, what is the right way to slice a grilled cheese sandwich? After many tasty tests my family and I have found that slicing the sandwich diagonally is the best way. That long cut releases a bit of the trapped heat and has more surface area to dip into the soup. Letting the panini rest for 3 minutes before slicing helps the melted cheese set up so it does not run onto the plate.

Enjoy the recipes below, try them and let me know how you enjoyed all the incredible layers of flavor. This is a family fun night meal, have the ingredients placed on the counter, the press warmed and dinner plates waiting. Kids LOVE making these, at least mine do, spreading the butter and stacking up the ingredients gives them such confidence. They also love to hold the press handle down and watch the cheese slowly melt and the bread brown. Enjoy one of my top 5 comfort foods, share your pictures over on Instagram with the #katescuriouskitchen

How to Cook A Panini

Pre-heat your panini press, carefully place your sandwich on the hot grill plates. Close down the top part of the press and cook according to the manufactures direction, usually 3-5 minutes. Remove with care, the sandwich will be very hot, wipe down the grill with a folded paper towel.  Place hot sandwich on a plate or cutting board, continue to cook additional panini sandwiches.

Brie, Arugula and Prosciutto Panini: Brush the outside of both pieces of bread with olive oil. Turn over and spread 1-2 tablespoon of sweet hot chutney on the inside of each bread slice. Add very thin slices of brie to each piece of bread. Next, add the prosciutto on top of the cheese, add a bit of baby arugula on top of that. Place the sandwich together and cook the panini as to your grills directions.

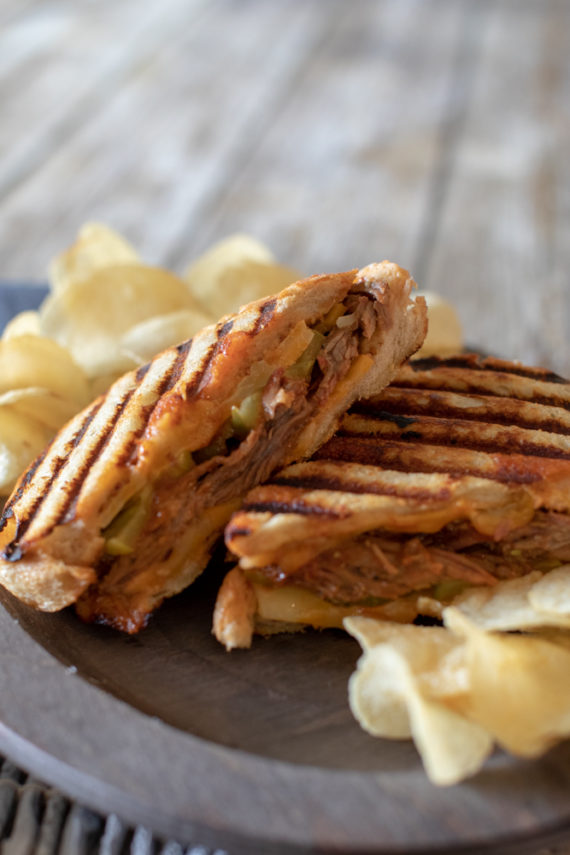
Texas Brisket Panini: Spread softened butter to the outside of two thick slices of sourdough bread. Take 1-2 tablespoons of grain mustard or your favorite BBQ sauce and spread on the inside of the bread slices. Add 2 -3 slices of Colby jack or cheddar cheese to each bread slice. Now add your cooked brisket to one side and top with pickles. Place the sandwich together and cook on the panini grill as per the grills instructions.

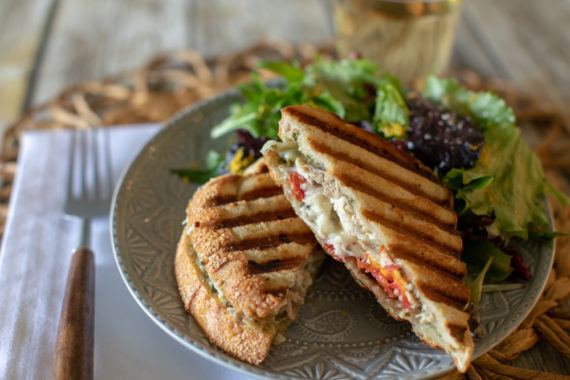
Chicken Caprese Panini: Split a ciabatta roll in half or slice two pieces of rustic artisan bread. Brush the inside and outside with olive oil. Evenly spread 1 tablespoon of pesto on the inside of the bread. Place two slices of fresh mozzarella on top of the pesto and two thin slices of tomato on top of the cheese. Add some pre cooked rotisserie chicken to one side a  drizzle of balsamic vinegar and carefully place the sandwich together. Cook as per your panini grills directions.

Cheers!

Roast Pork Loin with Apples

The flavorful aroma of apples, pork, spices and fennel truly is the perfect combination for any cold night. I recently attended a cooking class where the focus was apples and how their flavor added bright and tangy notes to simple dishes. Like adding Granny Smith apple into oatmeal as it cooks or searing sliced Gala apples then adding it to butternut squash soup. From the original varieties to todays amazing creations I was fascinated that an Envy apple can be cut, exposed to air and not brown for up to 6 hours with out the traditional lemon juice bath! Scouts honor, I’m telling the truth.

The bright and vibrant green of a Granny Smith apple (circa 1868), that tart lemon like firm flesh is perfect for an apple pie, apple chutney, and salads. I learned a surprising fact; the Honeycrisp apple has a different cell structure to its wall than all the other apple varieties it has unique honeycomb walls. Which, once broken by either a bite or a slice of a knife JUICE and lots of it is released. Hence the sweet taste and flood of juice is why they named that apple the Honeycrisp.

Choosing the correct apple.

When I’m at the grocery store or farmers market looking at all the apple varieties I get a bit tripped up at times. Which apple is best for baking? What about an apple I can grill? Which variety holds its shape while cooking and just the opposite what type breaks down? If you are like me and have similar questions, no fear I have the answers for you.

Top 5 Eating Apples

Honeycrisp, Sweetango, Piñta, Pink Lady, Fuji

Best Apples For Cooking & Sauces

Golden Delicious, Granny Smith, Gala, Pink Lady, McIntosh

Best Apples for Salads

Pink Lady, Honeycrisp, Gala, Envy, Fuji

Best Apples for Baking

Golden Delicious, Granny Smith, Rome, Pink Lady, Envy

Best Apples for Grilling

Pink Lady, Granny Smith, Fuji, Envy, Piñata

Best Apples Paired with Cheese

Rave; sharp cheddar cheeses, brie, soft creamy cheeses  

Honeycrisp; smoked cheese, creamy cheese and cheddar

Piñata; Goat cheese, blue cheese, creamy cheeses

I could fill this post with amazing facts I learned but for now I will leave you with a recipe that will not only bring out the rich flavor of pork but it will also celebrate the sweet and delicious flavors of my new favorite apple, the Envy apple. Enjoy!

Serves 4-6 Servings

Apples and Pork

This rich, flavorful roasted pork loin has the sweet-floral scent of fennel seeds, apples and onions. Then the bright spice of red chili flakes comfort you with every warming bite.

Save RecipeSave Recipe

Ingredients

  • Brine
  • 10 cups cold water
  • 2 cups apple cider
  • 1 cup Kosher salt
  • 1 cup light brown sugar
  • 1 head garlic halved
  • 2 tablespoons black peppercorns
  • 2 bay leaves
  • 2 tablespoons dried thyme
  • 4 pound pork loin
  • Fennel Spice Rub
  • 2 tablespoons whole fennel seed
  • 2 teaspoons red chili flake
  • 6 garlic cloves, crushed
  • 2 teaspoons dried thyme
  • 1 teaspoon salt
  • ½ teaspoon fresh ground black pepper
  • ¼ cup olive oil
  • Apples & Onions
  • 2 Envy apples, cored and cut into ½ inch slices
  • 2 medium sweet onions, cut in half then cut into thick slices
  • 2 tablespoons olive oil
  • ½ teaspoon kosher salt
  • ½ teaspoon ground black pepper
  • ½ cup apple cider

Instructions

  1. Brine; in a large container with a lid all the ingredients and mix well until salt and sugar dissolve.
  2. Place the pork loin in the container, make sure it is completely covered in the brine, if not add in water until it is.
  3. Place in refrigerator for 8-24 hours.
  4. Remove pork from the brine, rinse with cool water and pat dry, set on a baking sheet.
  5. Rub: place all ingredients into a food processor and blend until a smooth paste forms.
  6. If you do not have a blender a spice grinder or mortar and pestle will work. Remove 1 tablespoon of the rub and set aside, take remaining rub and spread over all sides of the pork loin.
  7. Lightly cover with plastic wrap and place back in the refrigerator.
  8. Heat oven to 350 degrees
  9. Place sliced apples and onions in a bowl and add remaining ingredients, except the apple cider, toss well.
  10. Add in the reserved 2 tablespoons of the spice mixture and stir well, set aside.
  11. Heat a cast iron pan for 15 minutes over medium heat, make sure it is large enough of fit the pork lion.
  12. In a deep baking pan add the apple mixture to it, spread evenly, set aside.
  13. When your cast iron pan is hot, remove the pork from the fridge, add 2 tablespoons of olive oil and sear the pork loin, fat side down for 8 minutes.
  14. Turn off the flame, carefully take the pork out of the pan and place on top of the apples and onions.
  15. Pour apple cider in the hot pan to deglaze, scrape up any bits left from the pork. Carefully pour the hot cider over the pork loin.
  16. Place pork in the hot oven and roast for about 1 hour or until the center is 140 degrees.
  17. Remove pork from oven once cooked and transfer it to a cutting board, tint with foil for 20 minutes.
  18. Return the apples and onions to the hot oven and cook for an additional 12 minutes to brown them.
  19. Slice the pork and serve the roasted apples and onions on the side.
7.8.1.2
1
http://katescuriouskitchen.com/roast-pork-loin-with-apples/

What a Dream…

A Dream Come True.

I have an announcement, something that I have been holding in and protecting for some time now. It started with a dream then it moved over to a wish and then it turned into something real, something I have been able to shape, contour and cultivate for months now. Yesterday morning November 12,2018 it all changed for me, that wish connected me ever so slightly to chef’s and cooks I have looked up to and learned from for years.

Julia Child the Master of French Cooking, Edna Lewis and her soul feeding food, Ina Garten and her flawless simply elegant meals, Ree Drummond and her lifestyle nourishment. Samin Nosrat and her explosion of the four food flavors. Gordon Ramsay and his Military perfection in the kitchen, Rachael Ray and her ease of preparation, Martha Stewart and her determination of home cooking perfection. Bernard Clayton and his layered pastry, Alice Waters and her dedicated seasonal movement, Americas Test Kitchen and their persistence to find the perfect recipe, Rick Bayless and his flavorful pallet of spice. Ruth Reichel and her passion with food, Jack Gilmore and his dedication to the Texas farmer, Steven Raichlen and his ability to tame smoke and fire. All the above names and countless others have one thing in common they are cookbook authors and as of yesterday I joined that list too.  I am a published cook book author!

I give you, The Campground Gourmet, Simple, Delicious Recipes for Dining in the Great Outdoors. Available now on Amazon.


I can not begin to tell you the amount of work that went into this project however, I can tell you about all the amazing and dedicated individuals that have helped me put all the pieces together. Stephanie and Jeremy Puglisi creators of RV Family Travel Atlas, they are my editors, they have spend countless hours editing, creating and guiding me along this adventure. I am truly grateful to the both of you and your belief in me, this cookbook and our friendship, thank you so much.

Steven Dunbar, my love and champion. You have always, always encouraged me to take adventures and just go for it. I can not think of a single time in our 12 years of marriage (13 on Friday 11/16) where you have asked me not to do something, you have never said no. But, I’m certain when I am in the thick of it you wish you had. I love you husband, thank you so much for all your help, encouragement and the strongest shoulder I could ever rest my head on when I was too tired to go any further. Oh, and for cleaning up when that raccoon destroyed my photo set on the patio, you are a saint.

To my children, you were my first true recipe taste testers, I made all your baby food when you could eat solids. I found out by trial and error what all your favorite cookies, meals, smells and tastes are. I have watched all three of you grow up and develop new tastes and favorite food memories. I love when you ask me to make your favorite meals, even if it is a box a macaroni (Paige) or a beurre blanc sauce (Andrew) or a perfect pan seared steak with a fried egg (Sean).

My friends and family who have been in the loop and truly kept my project safe and protected until yesterday when it was out there for everyone to see. Your encouragement, help and cyber cocktail time truly made this experience a magical gift. You helped me choose recipes, look at images and you also told me that when I made it big I owed all of you an Airstream or one heck of a vacation…I love each one of you and I appreciate your loyalty and friendship more than you could ever know.

I have always felt at home or in my comfort place at a campground, sitting in front the fire watching the golden coals smolder and send tiny shooting stars into the sky. The fire at a campground not only warms you up at the end of a long day of hiking or swimming in a lake, it feeds you. You can place a piece of cast iron over the coals and slip a fresh caught trout in that pan with onions, herbs some olive oil and a bit of salt and pepper and you have one of the best over the fire flavor meals anyone can create. It’s the fire, smoke and quiet, the total concentration of keeping the temperature there in just the right zone. It’s the laughter while watching a marshmallow swell with the heat of the fire only to spontaneously catch on fire and smolder away. It’s that crisp morning air and a rich hot cup of coffee in your favorite camp mug- it’s the great outdoors. There is so much my cookbook is about, the recipes are perfect for at home, at a park, sharing with your family at a celebration or sitting in Jackson, Wyoming under the peaks of the Grand Teton and all her beauty.

I’m Kate Dunbar, The Campground Gourmet, I tell stories through food and help individuals create culinary adventures with my recipes.

Kate's Curious Kitchen

Rise and Shine!

The Hawaiian culinary scavenger hunt continues!

Photo courtesy of Honolulu Fish Auction.
Honolulu Fish Auction. This photo is courtesy of the Honolulu Fish Market.

Ready, set, WAKE UP!!! I’m not kidding this is your 4am wake up call in paradise, seriously grab some Kona coffee put on your warm clothes (not kidding you will be in a freezer) and head out on the H1 Highway to Pearl City. The Honolulu Fish Auction is your destination, if you choose to take this crack of dawn food tour, please I beg you, go on the tour, but call ahead to make sure they are open I believe they are closed on Sundays. Have you ever wondered how fish is graded for sushi? How about watching the fishing boats unload their catch? This can all be done and I guarantee you will receive an education like no other and you will love it! Even better, bring cash with you and just like the fish markets and restaurants you can purchase your own fresh caught fish at a fraction of the price. 

 The prize I was after was a little know fish outside of Hawaii and the South Pacific, coming in anywhere between 1-18 pounds. Long about late summer when Hawaii’s waters turn cool the fish in deep waters develop a nice fat layer which adds a sweeter level to their flavor. I was after Hawaiian pink snapper, Opakapaka. This sweet and delicious fish is found at depths between 18 and 600 feet , all Opakapaka are caught by deep water hand line gear with power reels. The bright pink flesh garners a higher desire for its sashimi cuts because of delicate sweetness. 

Once I found my prize fish I headed back to our condo and started my food prep, the Opakapaka was seasoned and wrapped in foil then placed in the fridge to marinate. In addition I sliced up some Hawaiian sweet onions and seasoned with salt and pepper, fresh cut pineapple spears were in a zip bag with teriyaki sauce and red chili flake. Chinese long beans were in a foil pouch with sesame seed oil, sliced fresh ginger, Hawaiian sea salt and pepper. Long about 5:00pm I turned on the rice cooker and out the door I headed with our food, I was set to go make friends with that spectacular and ridiculous sized Weber grill outside. Now is where I slammed on the breaks, I turned the corner at the BBQ area entrance and you know that feeling when you walk in a room and all of a sudden every eye is on you and you might possibly be getting the judgement stare. Well, welcome to my experience, however there was a great lesson to be learned.


I made my way over to a grill and started to place all of my items on the table, pretty quickly the other people a the grills were looking my way. Then the questions started, “what’s in the foil?” “What are those long green things?” “Why is that pineapple red?” “You have a whole fish in there, can we see it?” “You a chef or something?” Welcome to Kate’s Curious Kitchen impromptu cooking school, there I was teaching six men and their friends all about layering flavors, fresh caught fish and how to get out of a BBQ rut. I should have charged them but I got a few nice beers out of it so all is good.

The moral to this culinary story is simple, share. Always share your knowledge, someone somewhere does not know how to cook what you are cooking and if they are interested, show them. Be open to new flavors, I really shocked the men when I grilled off some of that pineapple they were set on not liking it and low and behold there i was texting them the recipe. Simple twists and ingredient changes can develop a whole new level of flavor. Just like the previous post I have included some links for you to make your Hawaiian food shopping a bit easier, in no way am I receiving any compensation for providing these links. I just want you to have fun coking your food!

Mahalo and enjoy!!

Grilled Opakapaka

One, 5 pound whole Opakapaka or red snapper. Cleaned, de-scaled and patted dry

4 tablespoons fresh ginger, minced

4 garlic cloves, minced

1 bunch green onions rough chopped, white ends too

1 cup low sodium soy sauce

½ cup water

½ cup dry white wine

1 teaspoon alaea salt or Hawaiian sea salt

½ teaspoon black pepper

½ teaspoon toasted sesame oil

2 teaspoons Sriracha


Place your whole fish in a deep pan, set aside. In a bowl mix all your other ingredients together then pour over the fish. Make sure the marinade gets inside the fish too. Cover and place in the fridge for up to 4 hours, turning once at the 2 hour mark.

When ready to cook, heat your BBQ Grill, if using gas light all burners on high (500 degrees), if using a charcoal grill prep the charcoal mound in the center of your BBQ. When coals are covered in white ash they are ready. While the BBQ is heating make a double layer foil packet, cut it long enough to fold in half and cover the fish completely. Imaging the foil is a sleeping bag and the fish is going to be inside of that. Take ½ the chopped green onions out of the marinade and place on the foil pack. Remove the fish from the marinade; do not brush off any of the ginger or garlic. Place the fish on top of the green onions and now place the remaining green onions on top of the fish. Seal the foil up tight on all sides and take it out to your grill. Spread out the coals if using a charcoal grill, lower the two outside burners on your gas grill to medium lower the center burner to medium high.

Place fish on heated grill and close the lid, after 12 minutes flip the packet over and cook another 10 minutes.  Remove from grill and let it steam in the foil another 5-10 minutes while you are prepping the plates.

Open the foil and flake off pieces of the snapper; watch out for the bones they are long and very translucent. Serve with steamed rice, lemon wedges and a sprinkle of mirin sauce or just on its own, enjoy!


https://www.hawaii-seafood.org/auctiontour/

http://www.nohfoods.com/

http://www.onlyfromhawaii.com/seasonings.aspx

http://www.hawaiiansunproducts.com/


A Tropical Scavenger Hunt

ALOHA!!!!!

Ok I will admit it I needed a change of view, the past two and a half years have been quite the bullet train ride of change and direction. I thought a good rest would help me focus on my blog, give me some recipe inspiration and it would also be a time for my family to just laugh, play and watch incredible sunsets. After unpacking the pantry in our new home I realized my stock of Hawaiian salts, spices, coffee and kiawe wood (guava wood) for my smoker were horribly low. With all of our bags packed  we flew 3,750 miles from our Texas home to the beautiful northern most point of the Polynesian triangle, Hawaii! We landed on Oahu and made our way through Honolulu on the H1 highway to the west side of the Island. Ko’Olina was our home away from home with its pale brown sugar sand beach and that azure blue ocean I could feel my stress slipping away.  As a bonus our home had a fully stocked kitchen and a beautiful outdoor BBQ area that just called to me.

I decided before we ever set foot on the plane that the majority of our meals were not going to be at restaurants, I was going to cook the bulk of them. I needed the prep to be easy  because we had places to go and things to do, from exploring a coffee and chocolate  plantation to a ride on the pineapple train. The extent of our food ingredients would be local and I wanted them as fresh as possible, I decided the best sources would be farmers markets, small farms, local stores and plantations. One important factor for me was time, my time! I was not going to spend all day in the kitchen cooking and cleaning while we were in Hawaii. Paradise provided only because I was willing to go on the quest!

We ate fresh caught fish, sustainably raised pork, chicken and shrimp I found organic fruit and vegetables that were grown about 10 miles from our condo. Every morning we drank coffee that was roasted just days before it was packaged from a coffee estate that welcomes visitors. I was able to source salt and seasoning blends made from ingredients right on the island. All right I admit it I even found Hawaiian shaved ice syrups for my children, in Texas shaved ice is a must when its 110 degrees and 99.9% humidity in August!


In the car and off for an adventure my family and I were set with one thing in mind, Kaluku garlic shrimp. Our island food scavenger hunt was on and this dish has to possibly be the North Shores best food destination. These shrimp trucks are world famous and I can not begin to tell you that a trip to Oahu is not complete with out driving up coast to the North Shore. It’s not the white sand beaches, the perfect waves at Waimea Bay or the miles of hiking in the lush rainforest in the Waimea Falls Park. Nope, it’s the garlic shrimp from the shrimp trucks of the North Shore!

At Fumi’s Kahuku Shrimp Farm these delicious sweet and briny local crustaceans are sustainably farm raised gems of the Hawaiian aquaculture. Pull over and take the tour the farm it’s there for you to visit and see how shrimp are grown and the inventive way they collect the shrimp from one of the 80 outdoor ponds will shock you. Get back in your car and drive up the road to the shrimp truck capitol of Oahu, it’s at most a 5-10 minute drive depending on how many chickens are trying to cross the road. I’m not kidding if you have watched the Disney movie Moana, you will see Hei Hei the ridiculous rooster everywhere.


To make this recipe as authentic as you can, use a rice cooker and Hinode rice; the #1 brand Hawaiians have used for over 40 years. A large heavy duty aluminum pan is also key, because you have to get that pan screaming hot for the short cook time. I have also added a few website links so you can easily shop for your ingredients, I do not receive any compensation from these companies, I have provided the links to save you some searching time.

Mahalo and enjoy!

Kaluku Garlic Shrimp 

Ingredients

2 pounds of jumbo shrimp, shell on, de-veined and patted dry.

15 cloves of garlic, chopped

1/2 cup flour, all purpose

3 teaspoons paprika

3 teaspoons Hawaiian Sea Salt or Sea Salt

3 teaspoon cayenne pepper

2 teaspoon black pepper

1/2 cup dry white wine

1/2 cup fish stock or chicken stock

Chopped parsley or chives for garnish

Sliced lemon

Instructions

In a disposable aluminum pan or pie pan mix together flour, paprika, cayenne pepper, salt and pepper.
Dredge the shrimp in the flour mixture, remove and set aside on a baking sheet, throw away remaining flour in the pan if there is any.
Preheat your large skillet for 2-4 minutes on medium high heat, add the clarified butter to the pan, heat 2 minutes.
Add chopped garlic to pan and cook for about a minute.
Add your seasoned shrimp, cook for 3 minutes.
Turn shrimp over, cook 3 to 4 until the shrimp are a rich pink color.
Pour wine and stock into the pan and start to scrape all the caramelized garlic bits from the pan, cook for 2 minutes, taste and add salt and pepper if needed.
Serve over steamed rice, garnish with chopped parsley and the lemon wedge if you choose.


Hawaiian Culinary Links

http://www.hinoderice.com/

http://wailukucoffeeco.com/

https://alohashoyu.com/

https://www.dakinehawaiian.net/

https://www.doleplantation.com/

http://www.foodland.com


1 2