family

Barbecue Tri-Tip

Santa Maria Style Tri-Tip

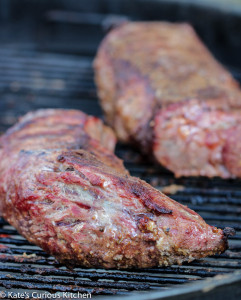
Welcome to California’s pride and joy of barbecue! This small to medium-size triangular muscle of the bottom sirloin subprimal cut (my God that was exhausting) screams for a good amount of spice, smoke and heat. I have done the official research and the credit needs to go to one man for making it as popular as it is today here in the golden state. Otto Schaefer marketed this cut back in 1950 in Oakland, California. But as far back as 1931 the cattlemen of the central coast, the Santa Maria area, were barbecuing meat on strings over hot coals with basic seasonings. Then the adoption happened Tri-Tip became Santa Maria’s ” signature pride and joy cut” truly barbequed beef was launched into a new territory. Go ahead, Google “Santa Maria Style BBQ.” I dare ya, oh and have a towel ready, you’re going to drool and go racing out to your nearest butcher to obtain this precious low-fat, full flavored cut of beef. I have two in my fridge right now about ready to kiss the grill any second.

 There is a bit of a disappointing part, many butcher shops east of the California/Nevada/Arizona border do not market the tri tip cut-you’re going to have to ask for it. This is where you will start to build a relationship with the specialist; a butcher, a professionally trained expert in the animal protein world. If you already have a good relationship with yours it’s going to get even better. I don’t know a butcher around that does not want to market the “next best cut” and tri tip will do it in spades. I’m also guessing you will be able to purchase it for quite a bit less than us right now I paid about $9.95 a pound. The secret is to not overcook this marbled fat flecked beauty. Medium is about as done as you will want it. The soft pink hue throughout its center is the signature look with its crusty pepper, garlic, salt and onion seasoning that perfectly kisses the char marked and smoked tri tip is out of this world.

PFC. Dunbar United States Army
PFC. Dunbar
United States Army

My son, Sean, has the say on this share, he’s kind of nuts over my barbecue seasoning and knows it’s one of my secrets. Before this entry is published I will send him the ingredient list so I can uphold my end of the bargain to let him know first above all others. I created my seasoning blend about 15 years ago, yes I was happily barbecuing away at age 24 living in my tiny two-bedroom home with my son Sean trying to make it as a single mom living humbly, very humbly. I would save my money all month I would budget correctly and buy one tri-tip then I would do the sin of the earth, I would cut that piece of beef into three smaller pieces so we could eat barbecue almost every Friday.

I would make a small pyramid of charcoal briquettes in my weber kettle grill then with a small well in the top I would crumple some newspaper and light it. When the coals were blazing red and covered in heavenly white ash I would place the grill grate over the coals and lightly oil it using a few paper towels crumpled together and soaked in a bit of cooking oil held with tongs and brushed over so the meat would not stick. I would wait about 10 minutes for that grill to get searing hot. Then I would throw a few mesquite wood chunks (not chips) on the hot coals just moments before the meat was put on the grill, quickly the backyard filled with sweet mesquite smoke the black pepper, garlic, onions and chili spice too. The sizzling and popping sounds from the searing meat and fat (I just drooled) were the symphony of a perfect Friday night Mother and son tradition. I would let that small portion cook on the grill for about eight minutes then I would turn the meat over and cook the other side about eight minutes longer. When it was ready I would take the tri tip off the grill and give it a good 10 minute rest time before slicing it. My choice is to slice it against the grain so the meat is most and tender, I would also make my slices about a ¼” thick, traditional tri tip cuts are about ½” thick. Sean would be waiting at our table in his seat just smiling away, as he ate I would watch my son melt in that tri trip’s smoky mysterious taste. I loved those Friday night dates with him, when he comes home on leave from the Army this one of the first meals he asks for.

If I was grilling a whole tri-tip it would be cooked a bit differently I would set up the charcoal in an indirect method, hot coals on one side of the kettle, empty space on the other. When it was time to put the meat on the grill grate you place it on the side without the heat directly below. Put  the lid on and position the vent holes over the tri tip to: draw the smoke around it further to add to the richness of the flavor, have the vent holes about 3/4 way closed. After about 45 minutes it was done and off the heat with a resting time of about 10 minutes. If you’re using a smoker 225° for about four hours with good mesquite, apple, or even pecan wood but only for the first two hours. Adding wood chunks will produce one heck-of smoke ring; it’ll be a gem! Get out your grill, clean it down, oil the grills grates and go see your butcher.

Cheers!

Tri-Tip Seasoning

Ingredients
1.    4 tablespoons Kosher salt
2.    4 tablespoons light brown sugar
3.    1 teaspoon paprika
4.    1 teaspoon ground pepper
5.    1 teaspoon ground cumin
6.    1 teaspoon dried oregano
7.    1 teaspoon dried parsley
8.    1/2 teaspoon turmeric
9.    1/2 teaspoon onion powder
10.    1/2 teaspoon garlic powder
11.    1/4 teaspoon chili powder
12.    1/4 teaspoon ground cinnamon
13.    1 teaspoon cornstarch

Instructions
1.    Place all ingredients into a zip bag or a jar with a lid and shake well. Store in your pantry or spice cabinet.

Notes
1.    This seasoning is also amazing on pork, chicken and lamb.

Home Made Ice Cream

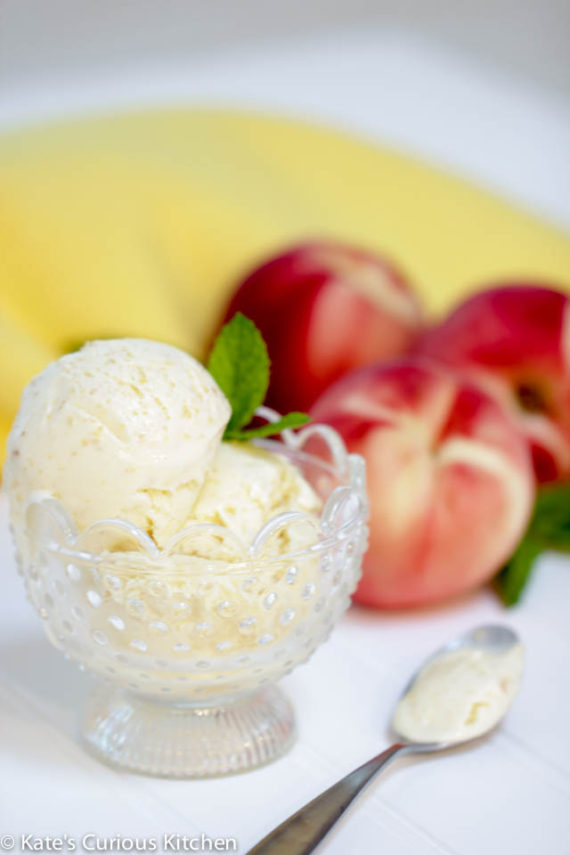
For years I have tried to make ice cream! Now really, how hard can it be? Hard! Either it’s too icy, too fatty or just not flavorful. However on a recent trip to Charleston South Carolina, I asked a pastry chef what was her secret? She said it’s in the milks and then in the bloom time-what is that? Walk me through the process, please. Would you believe it, she did! I learned that the French style (egg yolk based) is the best for ice cream. Half of the problem is the texture; and, that rich, creamy custard base is exactly what achieves the silky feel.

What to choose for the flavor; well, that is a tough pick. I’m a purist I prefer simple ingredients: vanilla beans that are plump and have possibly been sitting in a mason jar filled with Basil Hayden’s Bourbon for say maybe six months. Or, fruit picked at the peak of freshness and flavor. Peaches have just come into season here and they are amazing this year I see pints of peach ice cream in my future.

Now for the ice cream maker, long ago and far away, an old, banged up and battered, well-loved White Mountain hand crank ice cream maker was a staple during summer time. My backside would have frost bite from sitting on top of that machine for what seemed like hours. I’m going to pull a Sophia from Golden Girls moment on you. Picture it Ojai, California summer 1978 I’m three years old and it’s about 100° outside in the shade. My grandfather has just picked up ice and rock salt; my grandmother has just made the ice cream base. Outside on the patio, the ice cream making station was created. The frozen silver canister with its paddle was placed inside the wooden barrel ice cream maker, the ice cream base was added to that canister then the lid was attached and the sides were packed with ice and rock salt. A few folded burlap sacks sat on top of it keep it insulated. My Poppa would then grab a grandchild of his choice_ usually it was me_ and plop me on top of those burlap sack. Why you ask? Because my backside was small enough to sit on top of those burlap sacks on top of the ice cream maker holding the ice and salt in place. Poppa churned the ice cream until it was thick and frozen to perfection. When he was finished he, would throw me in the pool so my backside would warm up. Good times!

It was worth it! His vanilla ice cream tasted like nothing I have ever had. Unto this day I have still been trying to get it just right. So with the tricks of the different milks and the tip of bloom time (see recipe) I was given in Charleston by that pastry chef I came home and bought a Cuisinart ice cream maker and got to work. I came up with a recipe that used three different milk types: whole, half-and-half and whipping cream. It’s that balance it creates folds cream not milk crystals.

I hope you enjoy this recipe and please let me know how it works for you. I just visited the White Mountain ice cream maker website_ I’m thinking of getting one, I have twins their backsides are small just perfect for sitting on top of the ice cream maker! I could make a lot of ice cream this summer.

Cheers!

 Real French Vanilla Ice Cream

1 ½ cups whipping cream

1 cup whole milk

½ cup half and half

1 1/3 cup granulated sugar

4 egg yolks

1 whole vanilla bean

Pinch of salt

Optional: 1 cup chopped fresh fruit, ½ cup chocolate chips, 2 tablespoon fresh herbs, ½ cup jam or jelly, ½ teaspoon flavoring of your choice.

Directions:

Combine all three milks, sugar, and the pinch of salt in a medium saucepan.  Split and scrape the vanilla bean place it in the pot too.  Heat over medium-high, stirring occasionally, until the mixture is warmed through, do not boil just tiny little bubbles should form around the pans edge.  Remove the pan from the heat.

In a separate bowl, whisk the egg yolks until smooth and pale in color.  Slowly pour 1 cup of the warm milk mixture into the bowl with the egg yolks, whisking constantly this will temper the egg yolks so you won’t have scrambled eggs.  Return the entire mixture to the saucepan and place over medium heat.  Cook, stirring constantly and making sure to scrape the bottom of the pan, until the mixture thickens slightly and coats the back of a spoon (about 170 F).  Pour the ice cream base through the mesh strainer into the bowl; place vanilla pod back into the strained base, let the custard cool slightly, then cover and refrigerate until completely chilled (24 hours). Remove the vanilla bean before churning, add optional ingredients if wanted then follow the manufacturing directions of your ice cream maker and enjoy.


Welcome to Kate’s Curious Kitchen!


Kate's Curious Kitchen
Whitney Hartmann Photography

Hi, I’m Kate, welcome to Kate’s Curious Kitchen. Here you are going to explore adventures in the heart of my home! I love food, I love feeding my friends and family, I loved feeding my customers when I owned my café and now I get to share my love of food, recipes and stories with you. I believe that a kitchen is where stories start and where stories are retold over and over through out the years. Creativity creates memories and curiosity gives you the freedom to explore with no boundaries or walls to hold you back.

Food not only feeds you and your soul, it feeds conversations. Stories come alive if you can smell, see, touch and taste the very ingredient that started the conversation or sparked the memory. A recipe to me is a collection of ingredients and measurements that tell you what to gather, prepare and in what order to care for those ingredients. The story starts to develop as you take your time and put your energy into your dish. The flavors become infused with love, hope, pride, accomplishment, and sometimes-sheer luck!

I’m a self taught Chef I choose to build my professional career in the fabulous world of desserts. I was that girl who was 9 times out of 10 bored in school when I was growing up. Repetitive lessons and sitting still in a chair all day long was not at all creative and it truly did not feed my lust for learning. But my small hometown grocery store did, Lynn Noren owned and operated Noren’s Market and if he were alive today I would love to thank him for all of his inspiration. Within those walls, I was allowed to wander back into the coolers and watch vegetables being washed and sorted before being places in their displays. I watched mixers as big as me whip butter into a silky form. I would crane my neck around the butchers display case to just see what breaking down a side of beef took. Still to this day it truly amazes me, I consider it a true art form. I had FUN, I was learning, tasting, seeing, feeling and appreciating a craft. I just never put it together that this was my path; this world of food makes me truly happy.

I was always told if you have a strong foundation it can support you no matter what, all you have to do is believe in yourself. I am a believer now! I made a 4’ tall multi tier carrot cake for my cousins wedding with traditional cream cheese frosting. If I didn’t create a level and supportive foundation that cake would have toppled under its sheer weight (60lbs). But I trusted myself, I remembered the lessons my husband showed me (he delivered wedding cakes long ago) and above all else I believed in my craft, my recipe, my business, my creativity, my curiosity and I believed in me! Just like I believe that you can and will be able to recreate the recipes I publish.

I do have the amazing lineage of being a member in a farming family that for over 130 years has grown fruit and vegetables still on its original land. I was schooled in the art of eating seasonally I was brought up knowing oranges were the Christmas fruit. All I had to do was walk out of my home pick one from the back yard, Mom would cut it up and I could eat it up. Sundays were and still are for Sunday supper that wonderfully cared for meal shared by family members and friends where stories are the focus and flavors trap the memory.

My Blog is a bit unconventional, just like me. Stories, people, food, experiences and truth will be shared. I can tell you this blog will not be a quick read. This is a time for you to pour yourself a cup of tea, coffee, a glass of wine and sometimes a martini. Sit back and read about my inquisitive adventures with beautiful ingredients and meals. Come along and meet my family members, friends and colleagues. Hopefully my stories will jog your memory of a dish, ingredient or friend long ago forgotten, let me help you create new memories that stay with you for a long time. I am truly excited about this adventure. I hope you will share your recipes and stories with me and possibly find similar comfort in mine. I love when food helps the story come alive, I love it when I wake up curious about an herb or spice; and, go find the answer of where it is from, what does it taste like, what is its history and how can I use it in a recipe? Thank you for being curious about me. Now lets go start this new adventure!

Cheers!