Month: February 2019

5 Essential Fresh Herbs

I love to cook with fresh herbs, there is absolutely nothing like a the fresh taste of parsley, chives and butter with a good steak. The addition of mint to a fresh fruit salad or the bright somewhat fennel flavor fresh chopped tarragon adds to chicken salad. At my home I have two herb gardens, one out in my main garden where I grow the bulk of my vegetables and then a smaller raised garden bed out on our porch thats within walking distance to my kitchen.

At this moment, late winter I have at least 8 varieties of herbs growing; parsley, cilantro, chives, mint, tarragon, thyme, oregano and rosemary. I have two varieties of rosemary creeping and tall, three  types of thyme; common, elfin and lemon. Two lovely varieties of oregano; Greek and Italian. Why so many? What uses do I have have for all of those? Do they survive Texas winters or summers? All those answers and more are below and images of the 5 essential herbs I use in my recipes and as garnish in my images.

Basil

Highly aromatic with a robust licorice flavor. Excellent in pestos, as a finishing touch on pasta sauces and dishes, or stuffed into sandwiches.

Dill

Light and feathery herb with a pungent herb flavor. Use it with yogurt sauces, vinaigrettes, homemade pickles, poached fish, and sprinkles over salad greens.

Parsley

Available in flat-leaf (Italian) or curly varieties, this very popular herb is light and grassy in flavor. Use it in sauces, in salads, in place of cilantro, compound butters and as always a garnish.

Chives

Delicate onion and garlic flavor. Use with fish, baked potatoes, whipped in cream cheese and their flavor is perfect for creamy egg dishes.

Thyme

 A subtle, dry aroma anywhere from a lemon flavor to a slightly minty flavor. Best used with poultry, fish, vegetables, soups and is paired with tomatoes.

All Purpose Herb Salt
Save RecipeSave Recipe

Ingredients

  • 2 cups Kosher salt, coarse salt or Himalayan salt
  • 1 Tablespoon parsley, chopped
  • 1 Tablespoon rosemary, chopped
  • 1 Tablespoon Thyme, chopped
  • 1 Tablespoon black pepper, freshly ground
  • 1 lemon juiced and zested

Instructions

  1. Set oven to 250 degrees.
  2. Measure the Kosher salt into a medium size bowl add the fresh ground pepper to the bowl and set aside.
  3. Wash and dry all the fresh herbs, remove only the leaves and discard the woody stems from all the herbs.
  4. With a sharp knife and cutting board, finely chop the herbs and add to the salt.
  5. Wash and dry the lemon, using a zester remove the peel and add the zest to the salt and herbs.
  6. Juice the lemon you just zested, making sure to strain any pulp and seeds. Add the lemon juice to the salt and herbs.
  7. Stir the salt well so the lemon juice, herbs, and zest are fully incorporated. Spread the mixture evenly onto a baking sheet and bake 30-45 minutes or until the salt is no longer wet and looks very dry, stir the salt mixture carefully once or twice through the cooking process.
  8. Remove from the oven and allow to cool, take a fork or wooden spoon and break up the large pieces.
  9. Place in an airtight container for up to 6 months.
  10. Add to chicken, turkey, fish, vegetables, salads and added to unsalted butter to make a compound butter. My personal favorite is to add this salt over freshly popped popcorn and drizzled with a bit of brown butter.
7.8.1.2
2
http://katescuriouskitchen.com/5-essential-fresh-herbs/

Best-Ever Panini Press Sandwiches

I love when it is panini night at our home, the smell of browned butter and toasting bread. That crisp bread crunch and then the soft and silky melted cheese are culinary perfection. From melted Swiss cheese and onions to cheddar and bacon this meal is not only simple but packed full of flavor.

The challenge is to grill the bread correctly and achieve those deep grill marks with out burning, then getting the cheese to melt evenly but still hold its shape. The solution, use good and sturdy artisan bread that has 1/2 inch slices. Choose good cheeses, it is a must, sample as many as you can from your deli then make your selection. Letting your cheese sit out for about 5 to 10 minutes to get the chill off before grilling ensures even melting. Using a panini press that evenly heats the griddle plates is key, you can guarantee a crips texture, golden color and perfectly warm melted cheese filing.

You can find this exact model panini press in my pantry, I love the Cuisinart grill and panini press. The plates heat up quickly and evenly which toasts the bread or what ever you want to press in it. The simple to see green light turns on when your panini is ready, there is no guess work. The griddle plates are nonstick so your clean up time is a breeze, no more burnt on cheese remains. Along the backside there is a drip pan for catching any butter or olive oil run off.

Perfect Side Dishes for A Panini

Roasted tomato soup is the top side dish for any panini. With a creamy and silky texture this soup calls for melted cheddar, jack and cheese sandwich to be dunked then swooped up into your mouth to enjoy all that salty and rich flavors.

Arugula salad with lemon vinaigrette, the peppery flavor from the arugula and the bitter yet salty vinaigrette balance the fattiness of all that cheese. Use the same olive oil to brush over the bread for your the sandwich and in the salad dressing, the flavors marry the ingredients perfectly.

Sweet potato fries with a sprinkling of sea salt are a delicious addition to a warm spice panini grilled cheese sandwich. Think about adding rich Indian flavors such as sliced roasted curry chicken, chutney and gouda cheese.

Tips

If you choose to use a grill pan instead of a panini press, heat the pan on medium-low heat for 10 minutes. Place the buttered grilled cheese sandwich in the pan and reduce heat to low, add a small plate on top of it and a heavy soup can. That weight will press your sandwich perfectly.  Once the bread is golden brown and the cheese is melted remove it, sprinkle some finishing salt and fresh ground black pepper over the top or add some fresh chopped herbs.

Slicing, what is the right way to slice a grilled cheese sandwich? After many tasty tests my family and I have found that slicing the sandwich diagonally is the best way. That long cut releases a bit of the trapped heat and has more surface area to dip into the soup. Letting the panini rest for 3 minutes before slicing helps the melted cheese set up so it does not run onto the plate.

Enjoy the recipes below, try them and let me know how you enjoyed all the incredible layers of flavor. This is a family fun night meal, have the ingredients placed on the counter, the press warmed and dinner plates waiting. Kids LOVE making these, at least mine do, spreading the butter and stacking up the ingredients gives them such confidence. They also love to hold the press handle down and watch the cheese slowly melt and the bread brown. Enjoy one of my top 5 comfort foods, share your pictures over on Instagram with the #katescuriouskitchen

How to Cook A Panini

Pre-heat your panini press, carefully place your sandwich on the hot grill plates. Close down the top part of the press and cook according to the manufactures direction, usually 3-5 minutes. Remove with care, the sandwich will be very hot, wipe down the grill with a folded paper towel.  Place hot sandwich on a plate or cutting board, continue to cook additional panini sandwiches.

Brie, Arugula and Prosciutto Panini: Brush the outside of both pieces of bread with olive oil. Turn over and spread 1-2 tablespoon of sweet hot chutney on the inside of each bread slice. Add very thin slices of brie to each piece of bread. Next, add the prosciutto on top of the cheese, add a bit of baby arugula on top of that. Place the sandwich together and cook the panini as to your grills directions.

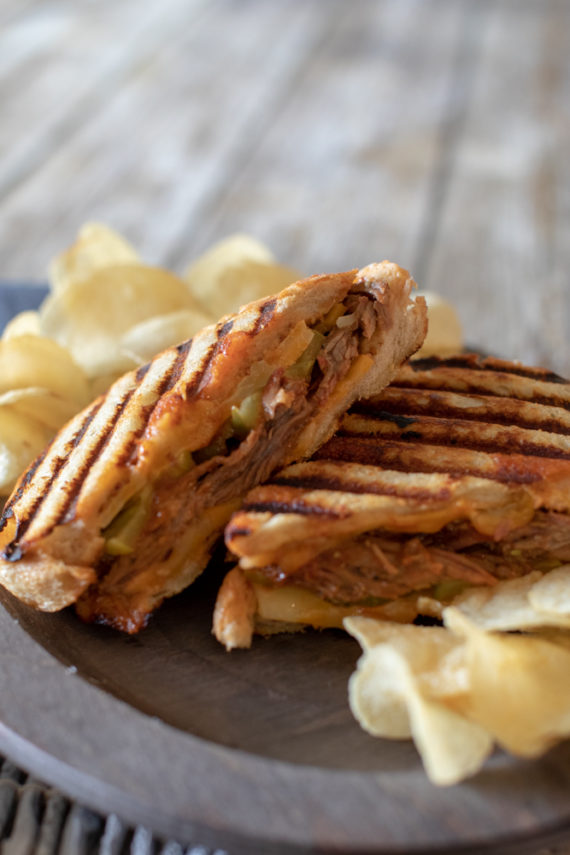
Texas Brisket Panini: Spread softened butter to the outside of two thick slices of sourdough bread. Take 1-2 tablespoons of grain mustard or your favorite BBQ sauce and spread on the inside of the bread slices. Add 2 -3 slices of Colby jack or cheddar cheese to each bread slice. Now add your cooked brisket to one side and top with pickles. Place the sandwich together and cook on the panini grill as per the grills instructions.

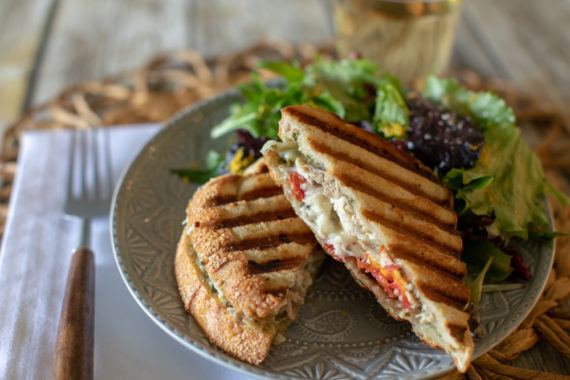
Chicken Caprese Panini: Split a ciabatta roll in half or slice two pieces of rustic artisan bread. Brush the inside and outside with olive oil. Evenly spread 1 tablespoon of pesto on the inside of the bread. Place two slices of fresh mozzarella on top of the pesto and two thin slices of tomato on top of the cheese. Add some pre cooked rotisserie chicken to one side a  drizzle of balsamic vinegar and carefully place the sandwich together. Cook as per your panini grills directions.

Cheers!